DIY: PICTURE FRAME MOLDING
By JEN WOODHOUSE

GETTING STARTED
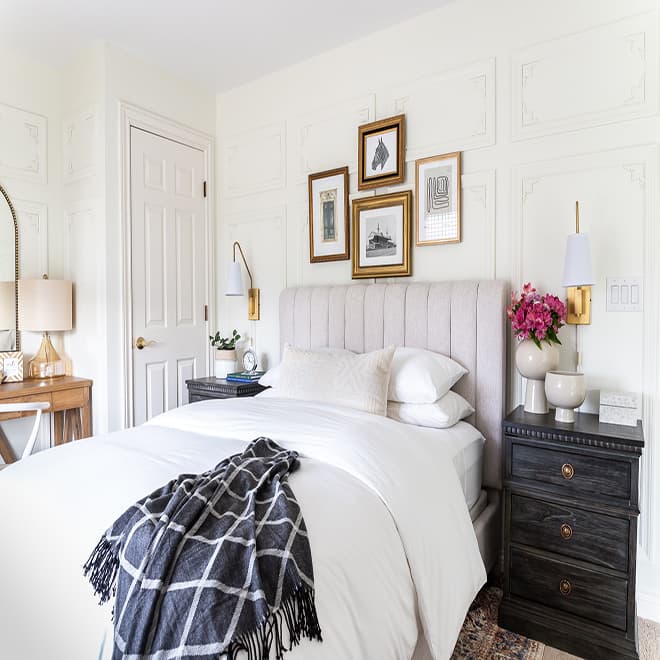
If you have a room in your home that could use a little more character, add a touch of European elegance with this DIY picture frame molding project. Grab your Arrow PT18G pneumatic brad nailer and let’s get to work!
YOU WILL NEED
.jpg&w=3840&q=75)
PT18G
Pneumatic Brad Nailer
Other Tools
Tape measure
Pencil
48″ level
Laser level
Compound miter saw
Caulk gun
Safety glasses
Hearing protection
Dust mask
Materials
Arrow brad nails
Cardboard
Primed pine casing
Construction adhesive
Silicone trim sealant
Painter’s putty
Ornamental corner moldings (optional)
PROJECT VIDEO
START BUILDING
STEP 1
To get started, it’s important to plan your layout. For this project, we landed on four large picture frame boxes centered on the wall with four small boxes at the top and 4″ spacing everywhere.
We created a 4″ square template out of cardboard to use as a reference point. For example, starting on the main focal wall, we placed the template in the bottom-right corner – where the baseboard and door casing meet – and made a mark. That way we knew we had 4″ from the baseboard and 4″ from the door casing, and from that we could start marking where each box should go. This little template came in super handy!
STEP 9
Once the framed pegboard is securely in place, it’s time to decorate! Additional pegboard hooks can be purchased from home improvement stores or online. This is the perfect time to put your own special touch on the project.

STEP 2
Now that you have a game plan in place, it’s time to transfer it to the room, starting in the corner we marked with the 4″ template. We used a level and drew out all the boxes on the walls, then double-checked our work with a laser level. Be sure to draw the picture frame boxes level and don’t go off of the baseboards or ceilings, as these are often not level, square, or true.

STEP 3
Next, it’s time to hunker down in the workshop to make your mitered cuts! We set the miter saw deck to 45° and started making the cuts. It’s a good idea to “sneak up on the cut,” meaning you should cut your pieces long and then shave off a little bit at a time until you get the exact measurement you need. This lowers your chances of making a mistake and cutting a piece too short.
Both ends of each piece are mitered so that they’re not parallel. That way when two pieces are put together, they form a picture frame corner. After all the cuts were made, we dry-fit the pieces together to see how it would look. You should cut the longest pieces first to ensure you’re not wasting any material.


STEP 4
To attach the molding to the wall, we used a construction adhesive and brad nails. First, we fastened the vertical pieces all around the room with the adhesive by simply lining them up along the pencil marks. Then we used the PT18G pneumatic brad nailer to secure them to the wall. If you’re adding ornamental corner moldings to your frames, now’s the time to nail those in place.

STEP 5
After installing the remaining trim, we caulked all the seams and joints with silicon trim sealant and filled the nail holes with painter’s putty. Then a few coats of fresh paint went up on the walls and voilà!

FINISHED PRODUCT

Installing DIY picture frame molding completely transformed this space. It’s a super-easy and affordable project that you can tackle in a weekend.
We’d love to see how your picture frame molding project turned out! Share your work with us on Facebook and Instagram by tagging @ArrowFastener or using #MadeWithArrow.
ABOUT THE AUTHOR
Jen Woodhouse
A self-taught carpenter with a fearless DIY spirit and a penchant for problem-solving, Jen Woodhouse offers in-depth tutorials that inspire and encourage readers to build their way to a more beautiful home.
WANT TO BE A FEATURED ARROW BLOGGER?
We’d love to hear from you! If you would like to be an Arrow Project Partner and contribute future posts here, contact us at projects@arrowfastener.com
We look forward to hearing from you!